Djangoで作ったWebアプリをラズベリーパイで起動させる
作成: 2019年02月26日
更新: 2021年03月29日
やりたいこと
Djangoで作ったアプリをラズベリーパイで起動させるではラズベリーパイ内に直接環境を構築したためラズパイの環境が汚くなり、AWSなどのVPSへ移行する際に環境を再構築するのが面倒である。
そこで今回はDockerを用いてなるべく環境を汚さずにサーバーを構築する。ついでにhttps化も行う。
必要なもの
ラズベリーパイ
あまり古いモデルだと動かないかも。筆者はmodel3B+を使用。色々セットで約8000円。Djangoアプリ
python manage.py runserverで動くDjangoアプリインターネット環境
固定IPだとなおよし上記とは異なるインターネット環境
サーバーと同じIPからはサーバーにアクセスできないので必要。wifiでないスマートフォンなどでいい。根気
Dockerとは
Enterprise Container Platform | Docker
Dockerとは構築する環境をDockerfileという名前で書きそれを読み込ませることで仮想環境を構築してくれるアプリケーションである。構築してみてうまくいかなかったときもその環境を丸ごと破棄することで元のパソコン(ホスト)の環境を汚さずに済む。
本来はもっと多様な機能があるがここではそんなに本格的には使わないのでこのぐらいの認識で大丈夫です。
Dockerのインストール
ラズベリーパイへのOSのインストールは色々なとこで書いているので割愛する。最新のNOOBSからRaspbianをインストールすればいい。
Dockerのインストールは下記を参考にして行う。
Get Docker CE for Debian | Docker Documentation
以下のコマンドを順に入力することでdockerをインストールできる。
sudo apt-get update
sudo apt-get install \ apt-transport-https \ ca-certificates \ curl \ gnupg2 \ software-properties-common
curl -fsSL https://download.docker.com/linux/debian/gpg | sudo apt-key add -
sudo apt-get install docker-ce docker-ce-cli containerd.io
以下のコマンドを入力してdockerのバージョンが出力されればインストールできている。
sudo docker versionドメイン取得
Dockerの設定をする前にドメインを取得する。.comなどは信頼感があるが取得料、更新料がともに高いのでここでは両方
無料の.tkを取得する。
.tkは国別トップドメインの一つでオーストララシアにあるニュージーランドの領土であるトケラウに割り当てられる。無料で取得できるので信頼感は0だがお試しにはちょうどいい。90日で25回の訪問がなかったサイトは、自動的に使用停止になるので注意。以下のサイトで取得する。
Freenom - 誰でも利用できる名前
ここで好きなドメイン名を入力し、指示に従うと取得できる。.tkのほか、.ml、.ga、.cf、.gqなどが無料で取得できる。取得中にForward this domein or Use DNSという欄が出るがここでUse DNSを選びUse Freenom DNS Serviceを選ぶ、そしてIPアドレスの欄を自分のIPアドレスにする。またPeriodを無料で取得できる最大の期間である12か月にする。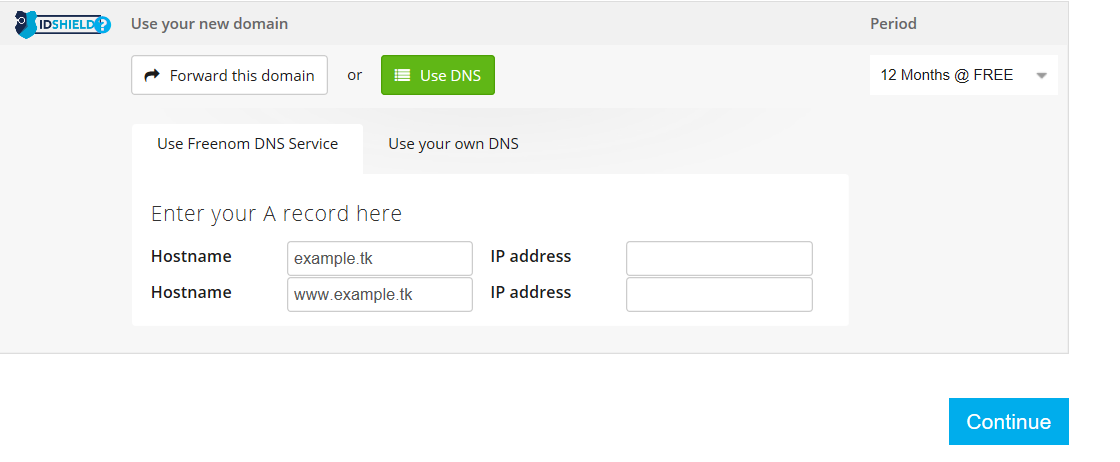
自身のIPアドレスは以下でチェックできる。
アクセス情報【使用中のIPアドレス確認】
www付きも一緒に設定できるがhttpsかのことを考えると面倒くさくなるのでしないほうがいい。この設定は後からでも変更できる。
取得からしばらく(長くても1時間くらい?)するとドメインと自身のIPアドレスが紐づけられる。おそらくドメインにアクセスするとルーターの設定画面に飛ぶはず。
ルーターの設定画面(上記の方法でいけない場合自身のルーターの公式から調べる)で静的IPマスカレード設定(ルーターによって名前が異なる可能性あり)により宛先IPアドレスをラズベリーパイのプライベートIPアドレス。変換対象IPアドレスを自分のWAN側IPアドレス。変換対象プロトコルをTCPとUDP両方。宛先ポートと変換対象ポートを共に80(www)に設定する。またhttps用に宛先ポートと変換対象ポートを共に443(443)に設定したものも設定する。この設定方法は家のインターネット環境によってさまざまなので色々と調べる必要があるかもしれない。以下は設定画面の例。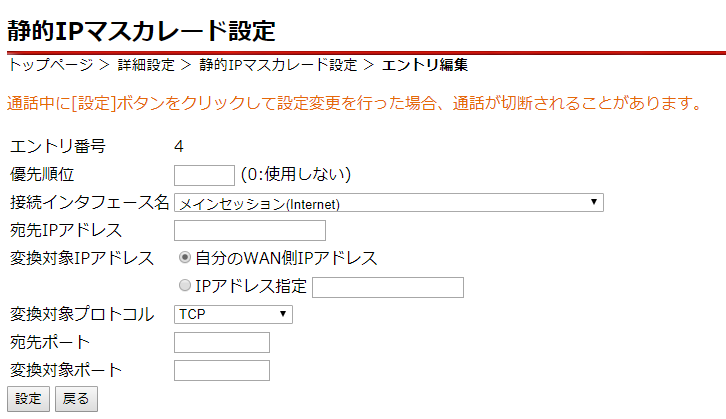
イメージ作成
DockerではDockerfileというテキストで書かれた環境をもとにイメージと呼ばれるものを作成し、それをもとに環境を構築する。
Dockerfileは以下を参考に書いた。
dockerfiles/django-uwsgi-nginx: Dockerfile and configuration files to build a working Django container with uwsgi and nginx
これはDjangoアプリをコピーするだけで環境を作れるもの。のはずなのだがラズベリーパイ上だとなぜかうまくいかないのでここのDockerfileを少し改変したものを用いる。
まずラズベリーパイ上にDjangoのプロジェクトディレクトリと同じ階層に以下のファイルを作る。example/をDjangoのプロジェクトディレクトリとする。またREADME.mdなどがある場合はそのままでいい。dir/はどこのディレクトリでも構わない。筆者はhomeディレクトリの下にディレクトリを作りそこに置いた。
dir/
├ example/
├ Dockerfile
├ nginx-app.conf
├ supervisor-app.conf
├ requirements.txt
├ uwisgy.ini
└ uwsgi_params
このうちsupervisor-app.conf、requirements.txt、uwsgi.ini、uwsgi_paramsを以下のように設定する。
supervisor-app.conf[program:app-uwsgi]
command = /usr/local/bin/uwsgi --ini /home/docker/code/uwsgi.ini

[program:nginx-app]
command = /usr/sbin/nginxrequirements.txt# requirements.txt
django
uwsgi.ini[uwsgi]
# this config will be loaded if nothing specific is specified
# load base config from below
ini = :base

# %d is the dir this configuration file is in
socket = %dexample.sock
master = true
processes = 4

[dev]
ini = :base
# socket (uwsgi) is not the same as http, nor http-socket
socket = :8001


[local]
ini = :base
http = :8000
# set the virtual env to use
home=/Users/you/envs/env


[base]
# chdir to the folder of this config file, plus app/website
chdir = %dexample/
# load the module from wsgi.py, it is a python path from
# the directory above.
module=example.wsgi:application
# allow anyone to connect to the socket. This is very permissive
chmod-socket=666
uwsgi_params
uwsgi_param QUERY_STRING $query_string;
uwsgi_param REQUEST_METHOD $request_method;
uwsgi_param CONTENT_TYPE $content_type;
uwsgi_param CONTENT_LENGTH $content_length;
uwsgi_param REQUEST_URI $request_uri;
uwsgi_param PATH_INFO $document_uri;
uwsgi_param DOCUMENT_ROOT $document_root;
uwsgi_param SERVER_PROTOCOL $server_protocol;
uwsgi_param HTTPS $https if_not_empty;
uwsgi_param REMOTE_ADDR $remote_addr;
uwsgi_param REMOTE_PORT $remote_port;
uwsgi_param SERVER_PORT $server_port;
uwsgi_param SERVER_NAME $server_name;requirements.txtはdjangoアプリを動かす上で必要なpythonのライブラリを記述する。最低限djangoは必要だが他に必要なものがあれば記述する。
nginx-app.confは以下のように記述する。
nginx-app.conf#nginx-app.conf
#the upstream component nginx needs to connect to
upstream django {
   server unix:/home/docker/code/example.sock; # for a file socket
   # server 127.0.0.1:8001; # for a web port socket (we'll use this first)
}

 # configuration of the server
server {
    # the port your site will be served on, default_server indicates that this server block
    # is the block to use if no blocks match the server_name
    listen      80;
    # the domain name it will serve for
    server_name example.tk; # substitute your machine's IP address or FQDN
    charset     utf-8;
    # max upload size
    client_max_body_size 75M;   # adjust to taste
    #letsencrypt認証用
    location /.well-known {
        root /home/docker/code/example/static;
    }
    # Django media
    location /media  {
        alias /home/docker/code/example/media;  # your Django project's media files - amend as required
    }
    location /static {
        alias /home/docker/code/example/static; # your Django project's static files - amend as required
    }
    # Finally, send all non-media requests to the Django server.
    location / {
        uwsgi_pass  django;
        include     /home/docker/code/uwsgi_params; # the uwsgi_params file you installed
        root /home/docker/code/example/app/templates;
        index topPage.html;
    }
}
servernameのところは先ほど取得した自身のドメインにしておく。そのほかのexampleの部分は自身のDjangoプロジェクト名などに合わせて適宜変更する。
次にDockerfileを以下のようにする。
DockerfileFROM ubuntu:18.04

# avoid freeze while configuring tzdata
ENV DEBIAN_FRONTEND=noninteractive

#Author
MAINTAINER author

CMD echo "now running..."

# Install required packages and remove the apt packages cache when done.
RUN apt-get update && \
    apt-get upgrade -y && \
    apt-get install -y \
    git \
    nano \
    python3 \
    python3-dev \
    python3-setuptools \
    python3-pip \
    nginx \
    supervisor \
    libtiff-dev \
    libjpeg-dev \
    zlib1g-dev \
    libfreetype6-dev \
    liblcms2-dev \
    libwebp-dev \
    tcl-dev \
    tk-dev \
    python-tk \
    certbot \
    sqlite3 && \
    pip3 install -U pip setuptools && \
   rm -rf /var/lib/apt/lists/*

# install uwsgi now because it takes a little while
RUN pip3 install uwsgi

# setup all the configfiles
RUN echo "daemon off;" >> /etc/nginx/nginx.conf
COPY nginx-app.conf /etc/nginx/sites-available/default
COPY supervisor-app.conf /etc/supervisor/conf.d/

# COPY requirements.txt and RUN pip install BEFORE adding the rest of your code, this will cause Docker's caching mechanism
# to prevent re-installing (all your) dependencies when you made a change a line or two in your app.
COPY requirements.txt /home/docker/code/
RUN pip3 install -r /home/docker/code/requirements.txt

# add (the rest of) our code
COPY . /home/docker/code/
EXPOSE 80
EXPOSE 443
CMD ["supervisord", "-n"]
同様にexampleをDjangoのプロジェクト名などで置き換える。Ubuntuをベースにしてnginx、Django、uwsgiの環境を構築する。
またDjangoのsettings.pyを本番用に以下のように設定する。
settings.py# SECURITY WARNING: don't run with debug turned on in production!
DEBUG = False

ALLOWED_HOSTS = ["*"]

~~~
中略
~~~

# Static files (CSS, JavaScript, Images)
# https://docs.djangoproject.com/en/2.1/howto/static-files/
STATIC_ROOT = os.path.join(BASE_DIR, 'static')
STATIC_URL = '/static/'

MEDIA_ROOT = os.path.join(BASE_DIR, 'media')
MEDIA_URL = '/media/'
DjangoのデバッグモードをオフにしてALLOWED_HOSTSをオンにしてドメインからのアクセスを受け入れるようにする。またstaticファイルの場所を設定しておく。mediaファイルは使わないのであれば設定しなくてもよい。
ここまでできたらDockerfileと同じ階層で以下のコマンドを実行する。結構時間がかかるので気長に待つ。
$ sudo docker build -t django .これで現在のディレクトリのDockerfileを参照してdjangoという名前のイメージが作られる。以下のコマンドでdjangoというイメージが作られていることを確認する。
$ sudo docker imagesサーバー起動
以下のコマンドを入力して先ほど作ったイメージからdockerを起動させる。
$ sudo docker run -d -p 80:80 -p 443:443 -v /etc/letsencrypt:/etc/letsencrypt django-pでポートを設定して、-vでdocker内のディレクトリとラズベリーパイ上のディレクトリを同期させる。後ほど取るhttps化のためのファイルをラズベリーパイ上にも置いておくために同期させておく。以下のコマンドでdockerがイメージからコンテナという仮想環境を構築していることがわかる。
$ sudo docker psこの状態でサーバーは起動できているはずなので自分のドメインにアクセスしてみる。もしできなかったときは以下のコマンドでdockerの中に入る。
$ sudo docker exec -i -t コンテナid bashコンテナidは上記のdocker psコマンドで分かる。
入れたら以下のコマンドでnginxのエラーログを出力する。
# cat /var/log/nginx/error.logそのエラーログにしたがって修正する。エラーログが出ていない場合はそもそもアクセスできていないので静的IPマスカレード設定などがうまくいっているか確認する。
https化
次にletsencryptを用いてhttps化を行う。
Let's Encrypt - Free SSL/TLS Certificates
https化を行うにあたってnginx-app.confやdjangoのstaticファイルを何度か修正するがそのときdocker上のファイルも更新できていることを確認し、以下のコマンド(docker内で行う)でnginx-app.confをdefaultにコピーする。
# cp /home/docker/code/nginx-app.conf /etc/nginx/sites-available/defaultまたdjangoのファイルを変更したときは以下のコマンドでdockerを再起動しないと反映されないことがある。
$ sudo docker restart コンテナid注意すべき点としてletsencryptの証明書をエラー込みで何度も申請すると何日か取れなくなってしまうので気を付ける(1敗)。
証明書の取得の際webアプリ上にファイルを置いてその存在を確認することでそのサイトの所有者であることを証明する。そのプロセスが行えるか確認するためにdjangoのstaticディレクトリに以下のようなファイルを置く。
test.htmltestそしてhttp://example.tk/.well-known/test.html にアクセスしてtestと表示されるか確認する。
次にラズベリーパイ上に以下のコマンドでcertbotというものをインストールする。
$ sudo apt-get update
$ sudo apt-get install certbot
そして以下のコマンドで証明書を取得する。
$ sudo certbot certonly --webroot -w /home/docker/code/example/static -d example.tk証明書のキーが/etc/letsencrypt/live/example.tk/以下にダウンロードされるので確認する。
証明書を取得できたらnginx-app.confを以下のように変更する。念のために元の設定を#でコメントアウトして残しても構わない。
nginx-app.conf# 本番用
# http redirect
server {
    listen 80;
    listen [::]:80;
    server_name example.tk;
    # letsencrypt更新用
    location /.well-known {
        root /home/docker/code/example/static;
    }

    location / {
        return 301 https://example.tk;
    }
}

# configuration of the server
server {
    # the port your site will be served on
    listen      443 ssl http2;
    listen [::]:443 ssl http2;
    # ssl config
    ssl_certificate     /etc/letsencrypt/live/example.tk/fullchain.pem;
    ssl_certificate_key /etc/letsencrypt/live/example.tk/privkey.pem;

    #config https://jyn.jp/ssl-aplus/
    ssl_ciphers 'ECDHE-ECDSA-CHACHA20-POLY1305:ECDHE-RSA-CHACHA20-POLY1305:ECDHE-ECDSA-AES128-GCM-SHA256:ECDHE-RSA-AES128-GCM-SHA256:ECDHE-ECDSA-AES256-GCM-SHA384:ECDHE-RSA-AES256-GCM-SHA384:DHE-RSA-AES128-GCM-SHA256:DHE-RSA-AES256-GCM-SHA384:ECDHE-ECDSA-AES128-SHA256:ECDHE-RSA-AES128-SHA256:ECDHE-ECDSA-AES128-SHA:ECDHE-RSA-AES256-SHA384:ECDHE-RSA-AES128-SHA:ECDHE-ECDSA-AES256-SHA384:ECDHE-ECDSA-AES256-SHA:ECDHE-RSA-AES256-SHA:DHE-RSA-AES128-SHA256:DHE-RSA-AES128-SHA:DHE-RSA-AES256-SHA256:DHE-RSA-AES256-SHA:ECDHE-ECDSA-DES-CBC3-SHA:ECDHE-RSA-DES-CBC3-SHA:EDH-RSA-DES-CBC3-SHA:AES128-GCM-SHA256:AES256-GCM-SHA384:AES128-SHA256:AES256-SHA256:AES128-SHA:AES256-SHA:DES-CBC3-SHA:!DSS';
    ssl_protocols TLSv1 TLSv1.1 TLSv1.2 TLSv1.3;
    ssl_prefer_server_ciphers on;
    ssl_session_cache shared:SSL:50m;
    ssl_session_timeout 1d;
    ssl_session_tickets off;
    ssl_stapling on;
    ssl_stapling_verify on;
    ssl_trusted_certificate /etc/letsencrypt/live/example.tk/chain.pem;
    # the domain name it will serve for
    server_name example.tk; # substitute your machine's IP address or FQDN
    charset     utf-8;

    # max upload size
    client_max_body_size 75M;   # adjust to taste

     # Django media
    location /media  {
        alias /home/docker/code/example/media;  # your Django project's media files - amend as required
    }

    location /static {
        alias /home/docker/code/example/static; # your Django project's static files - amend as required
    }

    # Finally, send all non-media requests to the Django server.
    location / {
        uwsgi_pass  django;
        include     /home/docker/code/uwsgi_params; # the uwsgi_params file you installed
        root /home/docker/code/example/frame/templates;
        index topPage.html;
    }
}
httpsのための最低限の設定を行っている。好みに応じてDHparamなど他の設定を行ってもよい。注意すべき点としてHSTSと呼ばれるhttp接続を一切行わせない設定を施すと後述のletsencryptの更新に支障がでるので推奨しない。これはletsencryptの証明書取得がhttp通信で行っているためである。
これでhttps接続が可能なはずなので確認する。
証明書自動更新
letsencryptは証明書の期間が90日とやや短い。そのため手動で更新するのは少し面倒である。よって公式でも推奨されている自動更新を設定する。
まず更新がきちんと行えるか確認する。以下のコマンドを入力して確かめる。
$ sudo certbot renew --dry-run--dry-runを付けることで実際には更新せず更新のシミュレートを行える。このコマンドでエラーが起きなかったら以下のコマンドでcrontabという自動プログラムの設定ファイルを開く。
sudo crontab -eそして最後の行に以下を書き加える。
crontab~~~
略
~~~
0 4 1 * * sudo certbot renew && sudo docker restart コンテナid
これで毎月1日4時に証明書の更新とdockerの再起動が行われる。
まとめ
長くなりましたがこれでdjangoアプリを公開することができます。RailsやLaravelなどほかのフレームワークでも適宜読み換えれば参考にできるかもしれません。
自分も試行錯誤しながら行ったのでもしかしたらうまくいかないところもあるかもしれませんが根気が大事です。